This post is a step by step tutorial on how to build a simple Slack command with Go.
- So, what are we going to build?
- Anatomy of a Slack command
- Local development with ngrok
- HTTP Requests
- Slack application and command
- Source code overview
- Running the app with Docker
- Deploying the app to Heroku
So, what are we going to build?
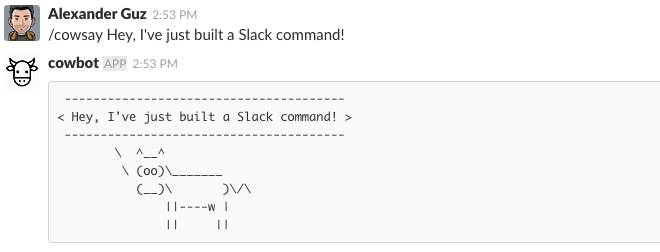
By the end of the tutorial, we’ll have cowsay <message> command, that formats the message in the same way as it’s Linux counterpart. It actually uses the Linux’s utility to do the job, so it basically just a wrapper with HTTP interface. The final result will look like that:
Anatomy of a Slack command
Before going into the implementation, let’s have a look at how Slack commands work, what we need to implement, and how all the parts will communicate with each other.
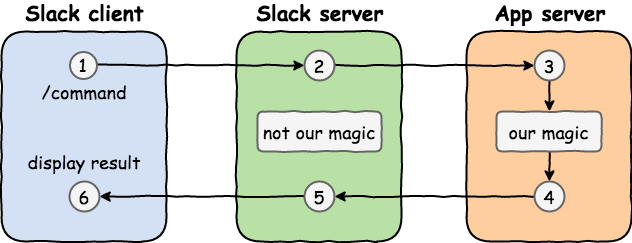
I know, I know. My drawing skills are awesome. But back to the diagram. Nothing fancy here:
- A Slack client sends a command, in our case
/cowsay Some text here. - Slack servers accept the command and do their magic. We care only that they then prepare a request in a defined format and send it to our application server.
- This is where we come into play - we basically need to write the application server, that will process requests from Slack servers.
- And respond back to Slack servers.
- Slack servers proxy our response from the application server back to the client, which…
- … displays the result to the user.
Local development with ngrok
As you can see from the diagram above, in order for our command to operate, Slack needs to send a HTTP request to some endpoint, which means that our application should be available on the Internet. This is not a problem once the application is deployed somewhere. But during the development phase we need our local instance be available for Slack. This can be done with ngrok. It lets you expose a local server to the Internet. Once started, it will provide you with a publicly available URL of your local server.
So, download and install ngrok first. Then run it:
$ ngrok http 8080Here we tell ngrok, that our server is running on port 8080 (not yet actually, but it will). If everything is OK, you’ll see a similar output:
ngrok by @inconshreveable                                 (Ctrl+C to quit)

Session Status                online
Version                       2.2.8
Region                        United States (us)
Web Interface                 http://127.0.0.1:4040
Forwarding                    http://502a662f.ngrok.io -> localhost:8080
Forwarding                    https://502a662f.ngrok.io -> localhost:8080

Connections                   ttl     opn     rt1     rt5     p50     p90
                              1       0       0.00    0.00    0.42    0.42

HTTP Requests
-------------
Pay attention to the URL, https://502a662f.ngrok.io, in Forwarding section: we’ll need to specify it in our Slack command configuration interface later.
Also, this URL is temporary, meaning that if you stop ngrok now (or close a terminal window, for example), on the next start you’ll get another URL. So, leave a terminal window with ngrok open for the duration of the tutorial.
Slack application and command
It’s time to do some clicky-clicky thingy: we need to create in Slack a workspace, an application, and a command. Go to create page and follow the instruction to register and create a new workspace.
After you’re done, go to the list of your applications and hit Create New App. There you have to specify your app name (doesn’t really matter) and select, which development workspace this app should be created in. Choose wisely! Choose your newly created workspace. For me it looks like this:

Now go to the application settings. Here you can configure all aspects of the application, for example, change icon under Display information. For us, the most interested part now is under App Credentials, where you can find a Verification Token:
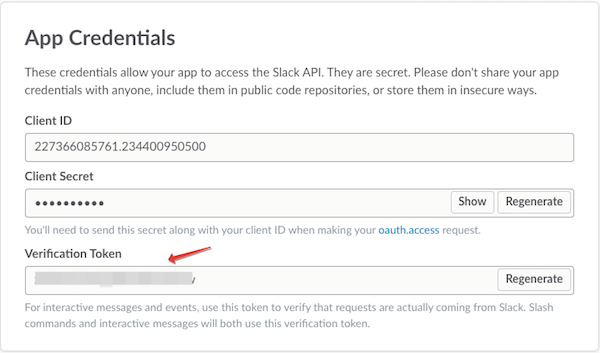
This token is used to verify, that HTTP requests to our server are actually coming from Slack. We’ll use it later in our source code.
The final step in Slack administration interface is to create a slash command. While you’re in the application setting, hit the Slash Commands in the left menu and then Create New Command. Here is what we need to enter:
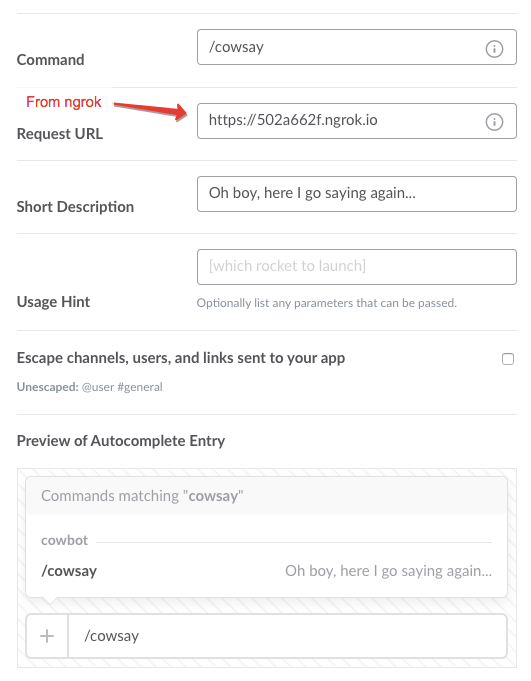
Pay attention here to the Request URL: this is the URL provided us by ngrok from Local development with ngrok step.
Source code overview
At last. It’s time for source code. In essence, our application is just a wrapper around cowsay utility with HTTP interface. It accepts POST requests and returns formatted text back. Full source code can be found in the GitHub repository.
Let’s review the startup procedure:
var (
	port  string = "80"
	token string
)

func init() {
	token = os.Getenv("COWSAY_TOKEN")
	if "" == token {
		panic("COWSAY_TOKEN is not set!")
	}

	if "" != os.Getenv("PORT") {
		port = os.Getenv("PORT")
	}
}

func main() {
	http.HandleFunc("/", cowHandler)
	log.Fatalln(http.ListenAndServe(":"+port, nil))
}
By default, the server will listen on port 80, but it can be changed by setting the PORT environment variable. The name of the variable is not random - this is a requirement from Heroku. The COWSAY_TOKEN must be set. This is a Verification Token from the Slack application and command step. It’s a secret value, that’s why we don’t put it to any configuration file. The alternative would be to pass it as an argument, but keeping secrets in environmental variables is a common practice.
Now, let’s have a look at the cowHandler function:
func cowHandler(w http.ResponseWriter, r *http.Request) {
	if r.Method != "POST" {
		http.Error(w, http.StatusText(http.StatusMethodNotAllowed), http.StatusMethodNotAllowed)
		return
	}

	if token != r.FormValue("token") {
		http.Error(w, http.StatusText(http.StatusUnauthorized), http.StatusUnauthorized)
		return
	}

	text := strings.Replace(r.FormValue("text"), "\r", "", -1)
	balloonWithCow, err := sc.Cowsay(text)
	if err != nil {
		log.Println(err)
		http.Error(w, http.StatusText(http.StatusInternalServerError), http.StatusInternalServerError)
		return
	}

	jsonResp, _ := json.Marshal(struct {
		Type string `json:"response_type"`
		Text string `json:"text"`
	}{
		Type: "in_channel",
		Text: fmt.Sprintf("```%s```", balloonWithCow),
	})

	w.Header().Add("Content-Type", "application/json")
	fmt.Fprintf(w, string(jsonResp))
}
Here is what’s going on:
- We allow only POST requests. Everything else will result in 405 HTTP error.
- We validate that requests come from Slack by checking the
token. It must be equal to what we set inCOWSAY_TOKEN. - The main job is done by
sc.Cowsay(text): it wraps the text from the request withcowsayutility. We’ll get to it later. - We prepare the response and return it as a JSON string. The response object in our case has two keys:
response_typeandtext. Thetextis, well, the response text. Theresponse_type: "in_channel"tells a Slack client to show the response from the command to everyone in the channel. Otherwise, only the one who issued the command would see the response (it’s called Ephemeral response). Read more about it here.
Now let’s see how sc.Cowsay(text) works:
func Cowsay(text string) (string, error) {
	cmd := exec.Command("/usr/games/cowsay", "-n")
	stdin, err := cmd.StdinPipe()
	if err != nil {
		return "", err
	}

	io.WriteString(stdin, text)
	stdin.Close()

	out, err := cmd.CombinedOutput()
	if err != nil {
		return "", err
	}

	return string(out), nil
}
It just executes cowsay and passes the text (the message we entered in the Slack client) to its standard input, and returns the formatted text back. Notice that we specify the full path to the executable /usr/games/cowsay. It we wanted to run this locally, we would need to make sure, that this binary existed under this path, but it’s hard to distribute our program then across computers, because the cowsay binary must be under the same full path. This is exactly why we’re going to distribute our application as a Docker container, where can provide predictable and fully reproducible environment.
Running the app with Docker
If you’re not familiar with Docker, then I suggest to read first an introduction article - here I’m not going into the internals. So, the Dockerfile:
FROM golang:1.9

RUN apt-get update && apt-get install -y cowsay

ADD . /go/src/github.com/kalimatas/slack-cowbot

RUN go install github.com/kalimatas/slack-cowbot/cmd/cowbot

CMD ["/go/bin/cowbot"]
Here we:
- Install
cowsay. It will then be under/usr/games/cowsay. - Copy the source from the current directory to
/go/src/github.com/kalimatas/slack-cowbot. - Install the binary to
/go/bin/cowbot. - Tell the Docker to use this binary (our server) as a command to start the container.
To build the image execute this command in the source directory of our application. Keep in mind that you’ll need to use another namespace, not kalimatas, because it’s mine :)
$ docker build -t kalimatas/cowbot .
// ... some Docker output
Now we have our image with the latest tag, and we can finally run the application locally:
$ docker run -it --rm --name cowbot -p 8080:80 -e COWSAY_TOKEN=<your_verification_token> kalimatas/cowbot:latestA few things to pay attention to:
-p 8080:80tells Docker to proxy the port80, which is the default for our application, to8080of the local machine. You can use a different port locally, but make sure, that this is the same port you specify when runngrok http 8080.-e COWSAY_TOKEN=<your_verification_token>sets the environment variable that will be read by our application later withtoken = os.Getenv("COWSAY_TOKEN").
Now the application is running and available on our local machine on port 8080. Let’s validate:
$ curl -XPOST https://502a662f.ngrok.io -d 'token=<your_verification_token>&text=Hello, cow!'
{"response_type":"in_channel","text":"``` _____________\n\u003c Hello, cow! \u003e\n -------------\n        \\   ^__^\n         \\  (oo)\\_______\n            (__)\\       )\\/\\\n                ||----w |\n                ||     ||\n```"}
Notice the URL we used here - https://502a662f.ngrok.io. This is the publicly available URL provided to us by ngrok. It means, that our application is actually available on the Internet, and you can even test the command in your Slack client!
But the magic will work only until we stop ngrok, or docker container, or just shutdown the computer. We need our application to be permanently available, that’s why we’re going to deploy it to Heroku.
Deploying the app to Heroku
First, create a free account, then install Heroku CLI utility.
Log in with your account:
$ heroku login
Enter your Heroku credentials:
Email: kalimatas@gmail.com
Password: *********************
Logged in as kalimatas@gmail.com
Now we’re ready to continue. Here you can find the documentation on how to deploy Docker-based app to Heroku. The plan is: create a Heroku app, tag our Docker image and push it to Container Registry.
Log in to Container Registry:
$ heroku container:login
WARNING! Using --password via the CLI is insecure. Use --password-stdin.
Login Succeeded
Create a new application:
$ heroku apps:create
Creating app... done, ⬢ guarded-island-34484
https://guarded-island-34484.herokuapp.com/ | https://git.heroku.com/guarded-island-34484.git
Here guarded-island-34484 is a randomly chosen name, and https://guarded-island-34484.herokuapp.com/ is the URL where the application will be available. As you might have guessed, we’ll need to update our Slack command settings, in particular Request URL, and set this URL. Check Slack application and command section for details.
Now we need to push our image to Heroku’s Container Registry. Heroku requires some spefic tag format, i.e. registry.heroku.com/<app>/<process-type>, where <app> is the application name, and <process-type> is, in our case, web. For more information check out this page.
Let’s tag and push our already existing kalimatas/cowbot:latest (it is probably different for you, if you have chosen another namespace) Docker image with a required tag:
$ docker tag kalimatas/cowbot registry.heroku.com/guarded-island-34484/web
$ docker push registry.heroku.com/guarded-island-34484/web
The push refers to a repository [registry.heroku.com/guarded-island-34484/web]
// ... other Docker output
If you open the application’s URL now in browser, it will not work:
$ heroku open -a guarded-island-34484This will open a new browser tab and you will see an error message Application error there. It happens, because our application requires the COWSAY_TOKEN environment variable to be set: check the init() function from Source code overview section. And we can prove it by reading the application’s logs:
$ heroku logs -a guarded-island-34484 | grep COWSAY_TOKEN
2017-09-15T06:56:37.477909+00:00 app[web.1]: panic: COWSAY_TOKEN is not set!
// ... other output
Obviously, we don’t have in Heroku by default - we need to set it. This is done via application’s configuration:
$ heroku config:set -a guarded-island-34484 COWSAY_TOKEN=<your_verification_token>
Setting COWSAY_TOKEN and restarting ⬢ guarded-island-34484... done, v4
COWSAY_TOKEN: <your_verification_token>
If you open the application now with heroku open -a guarded-island-34484, you will see another error Method Not Allowed, but this is expected, because we only allow POST requests.
Let’s validate, that the app is available by its public URL:
curl -XPOST https://guarded-island-34484.herokuapp.com/ -d 'token=<your_verification_token>&text=Hello, cow!'
{"response_type":"in_channel","text":"``` _____________\n\u003c Hello, cow! \u003e\n -------------\n        \\   ^__^\n         \\  (oo)\\_______\n            (__)\\       )\\/\\\n                ||----w |\n                ||     ||\n```"}
Amazing! Now don’t forget to set this URL in Request URL in your slash command’s settings in Slack admin interface!
Finally, open a Slack client, log in with your account, and start typing the name of the command - you will see a hint:
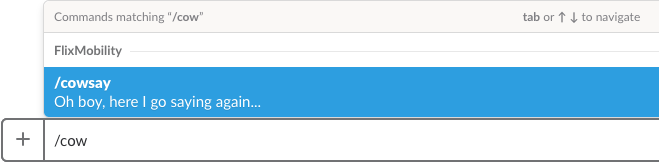
And the result: